This blog is no longer maintained, please visit http://danielbeard.io instead.
Setting up travis-ci for automated unit testing of iOS projects on GitHub
This guide is how I set up new projects to run unit tests automatically when I push a commit or merge a branch on GitHub for iOS projects.
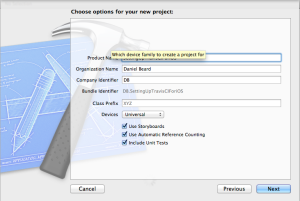
The first step is to create a new project in Xcode. I am going to select a single view application and enable storyboards, Automatic Reference Counting and Unit Tests.
All I’m going to change is the testExample method in the unit testing bundle to something that will pass. For now I have just gone with this:
- (void)testExample
{
    STAssertNil(nil, @"This object should be nil");
}
Check that the tests pass by hitting cmd+u. Now that I have my unit tests passing, I’m going to add this project to GitHub. I’ll leave the details out here, as this isn’t the focus of this tutorial but you can find my example project here: https://github.com/daniel-beard/SettingUpTravisCIForiOS.
Now we can setup the TravisCI build. I use the xctool to build my projects as it has a nicer output and is easier to use than the built in xcodebuild tool. Add xctool as a submodule to the git repository using the following commands:
git submodule add https://github.com/facebook/xctool.git ./xctool
git submodule update --init
git commit ./xctool -m "Added xctool as a submodule"
Then we need to add a config file so that travis-ci knows how to build our project. This file is named .travis.yml and lives in the root of the git repository. Here is the contents of mine:
language: objective-c
before_install: "git submodule init && git submodule update && sudo gem update --system && sudo gem install bundler && bundle install"
script: "bundle exec rake test --trace"
Then we have to add a Rakefile that tells the xctool which project and target to build:
desc 'Run the tests'
task :test do
   exec('xctool/xctool.sh -project SettingUpTravisCIForiOS.xcodeproj -scheme SettingUpTravisCIForiOS test')
end

task :default => :test
And finally the Gemfile
source 'https://rubygems.org'

gem 'rake'
You can then test locally that your project builds using the command rake in your root git repository.
I get build messages, then ** TEST SUCCEEDED: 1 of 1 tests passed ** (25285 ms). Now that we have the unit tests running locally, all that is left is to set up the travis-ci build. Login to https://travis-ci.org/ with your GitHub account and under account settings select the repository that should be unit tested automatically. This automatically sets up a service hook in GitHub so that every time you push to your repository, it will get unit tested.
You can also use the status images from travis-ci to show the test status directly in your README file on GitHub. Check out my example project here: SettingUpTravisCIForiOS
Developing Xcode 4 Plugins
This is a quick guide that documents how to start developing plugins for Xcode4. You need to have Xcode installed to create plugins.
Step 1 – Xcode Plugin Project Template
- Grab the Xcode project template for creating plugins from here
- Create the plugin template folder
~/Library/Developer/Xcode/Templates/Project Templates/Application Plug-in/Xcode4 Plugin.xctemplateif it doesn’t already exist. - A quick way to do this is with the following command
mkdir -p "~/Library/Developer/Xcode/Templates/Project Templates/Application Plug-in/Xcode4 Plugin.xctemplate" - Copy the contents of the GitHub repository to the folder you just created.
- Restart Xcode.
Step 2 – Create a test project
- Open Xcode, and select
File > New > Project - Then under
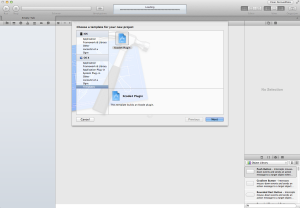
OS X > TemplatestapXcode4 Plugin(shown below)
From the GitHub repo:
The default plugin file links against AppKit and Foundation, and, when built
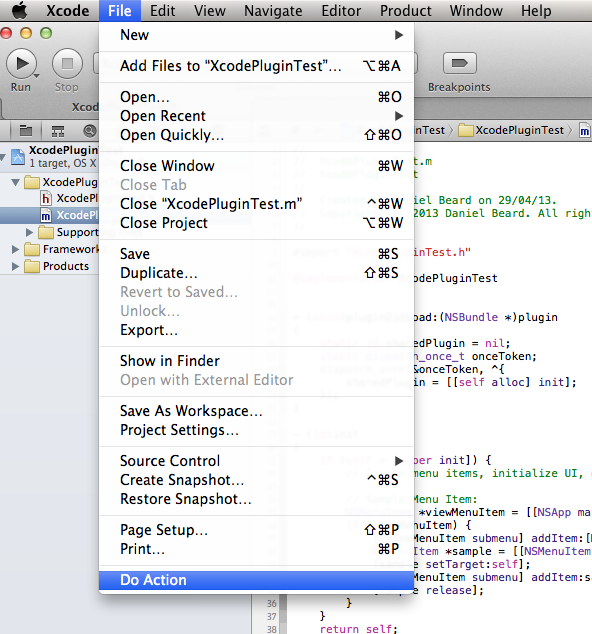
(and Xcode is restarted), creates a menu item labeled "Do Action" in the File menu.
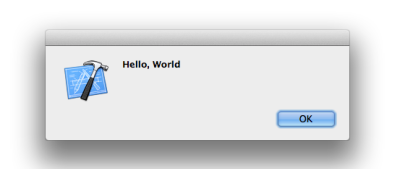
Pressing the menu item should open an alert. Customize at will!
If we run the project we just created, it will automatically build and copy the plugin to the right location. In this case it is ~/Library/Application Support/Developer/Shared/Xcode/Plug-ins/[Project Name].xcplugin. Restarting Xcode, we get a new menu item under the File menu!
When we click on the menu item, we get an alert:
Notes:
- Xcode plugins have to be written using Objective-C GC, this means you have to use
retainandreleasecalls in your code. (No ARC support).
Where to go from here?
- This StackOverflow answer has some great ideas on where to go next.
- You can get a dump of the private headers that Xcode uses by using the class-dump tool
brew install class-dumpis the quickest way to get it if you have homebrew installed.- IDEKit and IDEFoundation are present at
Xcode.app/Contents/Frameworks - DVTKit and DVTFoundation are present at
Xcode.app/Contents/SharedFrameworks - By registering an observer for
nilyou can see all the notifications that are being called. This is useful to find out which actions are called and when, and what notifications you might need to listen for.
Automated Unit testing an iOS app with Jenkins
- Setting up and executing automated unit tests is slightly more involved than generating built apps for distribution.
- The following is the set up that I use for some of my projects, I have just renamed the project to
TestProjectfor convenience. - For this article I am assuming that you have Jenkins, Xcode, Xcode Command Line Tools, and the Xcode Jenkins plugin already installed.
- Because I use cocoaPods for dependency management, I build a workspace using custom build schemes. To build a single project with a unit-test target would make these steps easier.
Dependencies
- HomeBrew
- Used as a package manager on OSX for easy installation of dependencies.
- Install from this website: http://mxcl.github.io/homebrew/ or by copy-pasting the following into the terminal:
ruby -e "$(curl -fsSL https://raw.github.com/mxcl/homebrew/go)"
- Ruby 1.9.3
- Needed for other dependencies.
- Can be installed via brew, or with RVM.
- I used RVM to set up my ruby install.
- Sinatra
- Sinatra is a ruby based server that we use for serving JSON fixtures to the unit tests.
- Can be installed using the ruby package manager
sudo gem install sinatra
- ios-sim
- Required because Xcode doesn’t allow unit tests to be run natively in the iOS simulator from the command line.
- Can be installed using brew:
brew install ios-sim
Step 1 – Poll SCM
- The
TestProjectJenkins job polls the SCM looking for changes to themasterbranch at midnight every night. - If no changes have occurred, then the project is not built.
- If modifications have been made, the next step is executed.
- If you want, Jenkins can be set up to build on a push to a branch. E.g. Pushing to the remote master branch.
Step 2 – Simulator and Sinatra setup
We run the following script:
#!/bin/bash

#reset the content and settings of the iphone sim
rm -r ~/Library/Application\ Support/iPhone\ Simulator/

#open the iphonesimulator and kill it
#this is required after a system restart
#so the simulator knows to run iPad rather than iPhone apps
echo "Opening iphone simulator"
open "/Applications/Xcode.app/Contents/Developer/Platforms/iPhoneSimulator.platform/Developer/Applications/iPhone Simulator.app"
sleep 10
killall 'iPhone Simulator'
echo "iphone simulator killed"

#delete previous build folders
echo "Removing previous build folder"
rm -r ${WORKSPACE}/build
mkdir ${WORKSPACE}/build

#Start sinatra server in the background
ruby TestProject/server.rb &

#get the PID of the process
PID=$!

#save PID to file
echo $PID > ${WORKSPACE}/sinatra.pid
- We first remove the iPhone Simulator folder
- This makes sure that no previous
TestProjectapps are installed on the simulator. Otherwise we may get core data upgrade problems.
- This makes sure that no previous
- We then have to open the iphone simulator and then kill it
- This is a stupid workaround that has to be done so that the iphonesimulator recognizes that we have to run an iPad application rather than an iPhone app.
- We then remove any previous build folders.
- Because we have our project set up as a workspace, there are multiple
.xcodeprojfiles and libraries that we have to build, including ourpodsdependencies. Because of this, our default build location is relative to the project, not located in theiPhone Simulatorfolder or in Xcode’sDerivedDatafolder.
- Because we have our project set up as a workspace, there are multiple
- We then start the sinatra server in the background
- The
&operator detaches the ruby process from the current shell so that once this script has finished, the sinatra server is still running. - We store the PID of the process to the
PIDvariable. - The
$!expands to the process ID of the most recently executed background (asynchronous) command. More details here - The PID is then written to file so it persists.
- The
Step 3 – Xcode Build
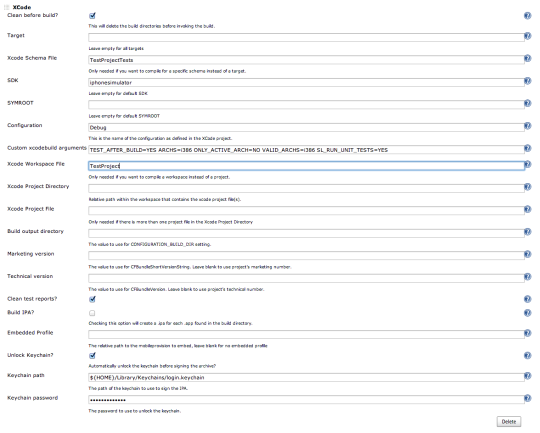
Below is a screenshot from jenkins showing the fields used for the xcode plugin
Clean before build– we don’t want any cached compiled objects hanging around.Xcode Schema File–TestProjectTests- Because of a limitation where workspaces can’t build targets directly, we have to use a Build Scheme to run unit tests. This scheme is set up the run the attached unit test target included in the production scheme
TestProject
- Because of a limitation where workspaces can’t build targets directly, we have to use a Build Scheme to run unit tests. This scheme is set up the run the attached unit test target included in the production scheme
SDK–iphonesimulator- We are targeting the simulator to run unit tests so we specify it here.
Configuration–Debug- Unit tests only execute in
Debugmode, so this option has to be this.
- Unit tests only execute in
Custom xcodebuild argumentsTEST_AFTER_BUILD– We manually specify that we want to run unit tests after building the project.ARCHS=i386– We have to force the architecture toi386because xcode wants to default toarmv6,armv7orarmv7s.ONLY_ACTIVE_ARCH=NO– Tell Xcode to not build just the architectures that it wants to by default.VALID_ARCHS=i386– We have to specify the architecture here again. Xcode does not make this easy for us.SL_RUN_UNIT_TESTS=YES– This is where the magic happens, this will be explained in more detail in the next section.
Clean test reports?- This outputs clean test reports so we can export them to
JUnitreports later.
- This outputs clean test reports so we can export them to
Unlock keychain?- Required so we don’t have to enter the password to use debugging.
Step 4 – Unit testing
As explained in the previous step, the SL_RUN_UNIT_TESTS=YES xcodebuild argument is extremely important.
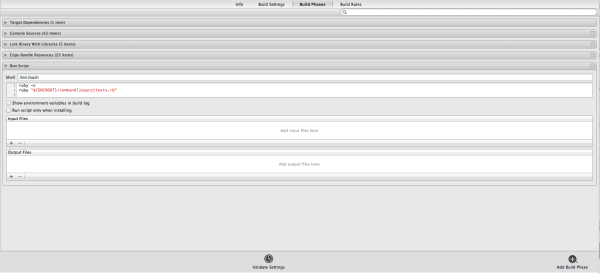
The TestProjectTests target in Xcode has a custom script that it executes after building. The script can be found in Project Settings -> TestProjectTest -> Build Phases -> Run Script
The script is shown below:
ruby -v
ruby "${SRCROOT}/commandlineunittests.rb"
- The first line is unnecessary, and just used for outputting the ruby version.
- The second line calls a ruby script that is present in the repository that kicks off the unit tests.
The second ruby script is shown below:
if ENV['SL_RUN_UNIT_TESTS'] then
    launcher_path = "/usr/local/bin/ios-sim"
    #File.join(ENV['SRCROOT'], "Scripts", "ios-sim")
    test_bundle_path= File.join(ENV['BUILT_PRODUCTS_DIR'], "#{ENV['PRODUCT_NAME']}.#{ENV['WRAPPER_EXTENSION']}")

    environment = {
        'DYLD_INSERT_LIBRARIES' => "/../../Library/PrivateFrameworks/IDEBundleInjection.framework/IDEBundleInjection",
        'XCInjectBundle' => test_bundle_path,
        'XCInjectBundleInto' => ENV["TEST_HOST"]
    }

    environment_args = environment.collect { |key, value| "--setenv #{key}=\"#{value}\""}.join(" ")

    app_test_host = File.dirname(ENV["TEST_HOST"])
    system("#{launcher_path} launch \"#{app_test_host}\" #{environment_args} --args -SenTest All #{test_bundle_path}")
else
    puts "SL_RUN_UNIT_TESTS not set - Did not run unit tests!"
end
- The script checks for that magic variable
SL_RUN_UNIT_TESTSand if it’s present runs the unit tests. - Using the
ios-simdependency, the script dynamically patches theTEST_HOSTof the ios simulator and runs the unit tests. This is really complicated to try and do by hand, which is what we were doing before usingios-sim
Step 5 – Cleanup
The following script is executing after the unit tests have finished, regardless of the output status (PASS or FAIL).
#!/bin/bash

PID=$(<${WORKSPACE}/sinatra.pid)
echo "Sinatra server pid $PID"

kill -9 $PID
- This script reads the process id (
PID) from the file we stored earlier containing thesinatraserver’s PID. - We then kill the
sinatraprocess.- We don’t want the
sinatraserver hanging around after the unit tests have run, because subsequent tests will fail because they will try to start asinatraserver using the same port as the previous process.
- We don’t want the
Auto build and deploy iOS apps using Jenkins
We will have a look at a TestProject to get an idea of how jenkins can be used to build, sign and deploy iOS projects. The whole process consists of 4 steps. Note that to deploy an app in this manner, an enterprise distribution certificate is required for each app.
This guide is how I have set up my enterprise builds for my apps that use cocoaPods for dependencies, but most of the same principles apply for any iOS apps.
Because the project uses cocoaPods, it means we have to build a workspace and have a build scheme set up.
Note: Apple Enterprise licenses can ONLY be used for builds internal to your company. I am not responsible for anything that may happen if you try to distribute apps outside your company using an enterprise license.
This guide may be a bit brief, don’t hesitate to ask me any questions. This is mostly for my own reference.
Step 1 – Poll SCM
- Dev builds poll the SCM looking for changes to the
masterbranch at midnight every night. - If no changes have occurred, then the project is not built.
- If modifications have been made, the next step is executed.
Step 2 – Xcode build
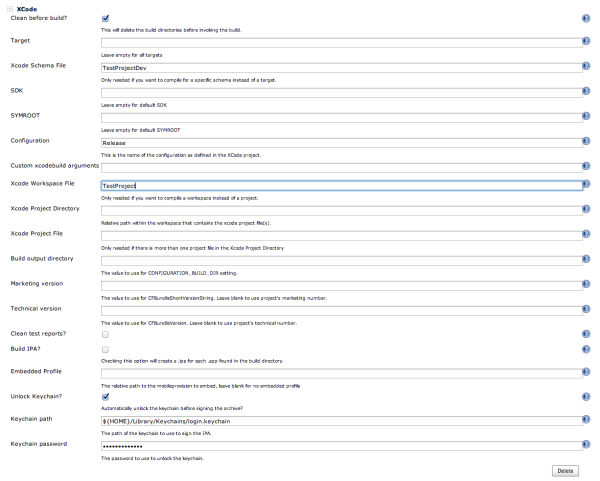
Below is a screenshot from jenkins showing the fields used for the xcode plugin.
Clean before build– we don’t want any cached compiled objects hanging around.Xcode Schema File–TestProjectDev- Because of the way we have our project set up, our top level item is a workspace (
TestProject.xcworkspace), we have to build based on Schemes as Xcode does not support building a target from a workspace. TestProjectDevspecifies the scheme we want to build with.
- Because of the way we have our project set up, our top level item is a workspace (
Configuration–Release- We want the release version. There are several subtle differences between
DebugandReleaseversions. The most notable is thatDebugbuilds are usually built for just one architecture, whereReleasebuilds are built for all supported architectures, usually with compile time optimisations as well.
- We want the release version. There are several subtle differences between
Workspace File– This is our top level workspace file (TestProject.xcworkspace) that we build from. If this option wasn’t specified, by default the xcode build would look for the first*.xcodeprojfile it can find. This would cause our build to fail.Unlock Keychain- This allows us to unlock the keychain which is required for signing or resigning
.ipafiles. - The location of the keychain is the default OSX location
- This allows us to unlock the keychain which is required for signing or resigning
Step 3 – Resigning
- This step only occurs if previous steps were successful
- This step only occurs if the text
BUILDis present in the log text (basically every build) - The result of this build will be escalated to the job status. If this step fails and other steps before it were successful, the job will still fail.
Below is the script used for resigning:
#!/bin/sh

PROJECT_BUILDDIR="${WORKSPACE}/build/TestProject/Build/Products/Release-iphoneos"
APPLICATION_NAME="TestProjectDev"
BUILD_HISTORY_DIR="/Users/administrator/Provisioning/builds"
DEVELOPER_NAME="iPhone Distribution: Test Company LTD"
PROVISIONING_PROFILE="/Users/administrator/Provisioning/TestProjectDevDistributionProfile.mobileprovision"
HOST_LOCATION="/Library/WebServer/Documents/apps"

#Sign The .app file and create .ipa file
/usr/bin/xcrun -sdk iphoneos PackageApplication -v  "${PROJECT_BUILDDIR}/${APPLICATION_NAME}.app" -o  "${BUILD_HISTORY_DIR}/${APPLICATION_NAME}.ipa" --sign ${DEVELOPER_NAME} --embed ${PROVISIONING_PROFILE}

#Get the version from the Info.plist file
APP_PATH="${PROJECT_BUILDDIR}/${APPLICATION_NAME}.app"
VERSION=`defaults read ${APP_PATH}/Info CFBundleShortVersionString`
BUNDLE_ID=`defaults read ${APP_PATH}/Info CFBundleIdentifier`

# Create plist
cat ${HOST_LOCATION}/template.plist | sed -e "s/\${APP_NAME}/$APPLICATION_NAME/" -e "s/\${BUNDLE_ID}/$BUNDLE_ID/" -e "s/\${BUNDLE_VERSION}/$VERSION/" > ${HOST_LOCATION}/${APPLICATION_NAME}.plist
- The first part of this script sets up the locations and script variables
PROJECT_BUILDDIR– The folder that the built.ipafile resides from the previous build step.APPLICATION_NAME– In this case it isTestProjectDevBUILD_HISTORY_DIR– The folder that the re-signed app will be output toDEVELOPER_NAME– Has to match the.mobileprovisionfile used for signing.PROVISIONING_PROFILE– The location of the.mobileprovisionfile used for signing. These must be downloaded from the Apple developer website or shown in Finder from the Xcode organizer.HOST_LOCATION– Where the final signed app will exist
- The next stage of the build process is actually re-signing the app using the Xcode command line tool called
xcrun. Note that the version in/usr/bin/is a symlink to the Xcode version that has been selected by thexcodeselectcommand line tool. This is important if more than one version of xcode is installed. Each version of Xcode stores command line tools inside the.appfile in applications. - After re-signing, we grab the version, and bundle-id. These are used in the next part
APP_PATH– The full path including the.appextension of the re-signed appVERSION– This is theCFBundleShortVersionString. This value is set when you change the version in Xcode for each of the build schemes.BUNDLE_ID– TheCFBundleIdentifierfor the built app. ForTestProject, this will beau.com.wordpress.danielbeard.TestProject. These can be set by modifying the build Schemes, but shouldn’t be changed for existing applications. Production has a different bundleId, which is what allows for both the dev and prod versions to exist on a single iPad at the same time.
- We then auto generate the enterprise install PLIST file. This is needed to install apps from a URL location and acts as a “description” of the app that is about to be installed.
- The actual creation of this file is quite simple, we use
catto copy thetemplate.plistfile to the new location and then usingsedwe replace theBUNDLE_IDandBUNDLE_VERSIONvalues. These values are read from the Apps Info.plist from inside the .app folder.
- The actual creation of this file is quite simple, we use
- Below is an example template.plist file
<?xml version="1.0" encoding="UTF-8"?>
<!DOCTYPE plist PUBLIC "-//Apple//DTD PLIST 1.0//EN" "http://www.apple.com/DTDs/PropertyList-1.0.dtd">
<plist version="1.0">
<dict>
        <key>items</key>
        <array>
                <dict>
                        <key>assets</key>
                        <array>
                                <dict>
                                        <key>kind</key>
                                        <string>software-package</string>
                                        <key>url</key>
                                        <string>http://hostlocation/apps/${APP_NAME}.ipa</string>
                                </dict>
                        </array>
                        <key>metadata</key>
                        <dict>
                                <key>bundle-identifier</key>
                                <string>${BUNDLE_ID}</string>
                                <key>bundle-version</key>
                                <string>${BUNDLE_VERSION}</string>
                                <key>kind</key>
                                <string>software</string>
                                <key>title</key>
                                <string>${APP_NAME}</string>
                        </dict>
                </dict>
        </array>
</dict>
</plist>
Step 4 – Copying to host location
- This step simple grabs the signed
.ipafile and puts it in the host location so that the macmini website can serve it over a URL. The host location is/Library/Webserver/Documents/apps
Script looks like this:
#!/bin/sh

APPLICATION_NAME="TestProjectDev.ipa"
BUILD_HISTORY_DIR="/Users/administrator/Provisioning/builds"
HOST_LOCATION="/Library/WebServer/Documents/apps/"

cp "${BUILD_HISTORY_DIR}/${APPLICATION_NAME}" "${HOST_LOCATION}${APPLICATION_NAME}"
And that’s it! The output is a .ipa file and a .plist file. These are both required to install an enterprise app.
Objective-C Style Guide
This is the style guide that I follow when programming in Objective-C, this is for my own reference, but other people may find this useful.
General
- Use modern objective-c 2.0 syntax
- Use ARC whenever possible.
- Manual memory management should only be used when using older libraries that haven’t been updated yet.
- Use tabs when indenting, not spaces.
Code Naming Basics
- Follow the Apple naming guidelines
- Use descriptive names, even if they are long. Xcode has great code completion features. Use them.
- Clarity is preferred over all else.
- E.g. Compare the two methods:
[spaceship fly: 10.0f]and[spaceship flyAtSpeed: 10.0f]. - Note how much clearer the second declaration is, the method describes its intentions and parameter names.
- Don’t use abbreviations. E.g.
bgColorvs.backgroundColor - Custom resuseable classes should be prefixed with
AFG- Application level classes do not have to be prefixed. E.g. ViewControllers
- All view controllers should be descriptively named and end with
ViewController.- E.g.
CalculatorSettingsViewController
- E.g.
Commenting
- Follow the appledoc code formatting style.
- Only comment the method declarations. E.g. In the
@interfaceor private@interface ... ()code blocks. - Describe what the method does, the parameter names and the return value and what it signifies. The following is a good example of method commenting:
/** This method asks the delegate if the AFGContainerViewController should pop the current view from the view stack.
 @param - The current AFGContainerViewController object
 @return A BOOL value indicating if the current view controller should be removed from the AFGContainerViewController's view stack.
 */
-(BOOL) AFGContainerViewControllerShouldPopContainerViewController: (AFGContainerViewController*) containerViewController;
Spacing
-(void) performOperationWithObject: (NSObject*) objectName {

  NSLog(@"This is a well spaced method");
  [objectName performSomeOperation];
}
- No space between the class or instance specifier
(+,-) - Single space between the return type and method name
- Single spaces between method signature, object types and object names
- Brace on the same line as the method signature.
- Optional newline below the method signature for readability
- No newline before the closing brace
Variables and Initializers
- Variable names should always start with lower case.
- Good:
numberOfObjects - Bad:
NumberOfObjects
- Good:
- Clearly identify the designated initializer for the class
- All other initializers should propagate up to and use the designated initializer.
- Override the superclass’ designated initializer.
- Initialization method should be at the top of the
@implementation - Don’t explicitly initialize variables to nil. Under ARC this happens automatically.
Properties
- Don’t
@synthesizeproperties. ARC does this automatically. - Always start with a lower case letter.
NSStringproperties should always becopyIBOutletsshould always beweak
Other readings
These are some good references / starting points for creating your own style guide or just to see other coding styles.
Objective-C Runtime
It is pretty rare to actually have to dive into the objc-runtime for any day to day coding. Most developers wont have to touch the runtime, however it is helpful to know what is possible and be able to use it if required. The objective-c runtime is written in C and is how the underlying parts of the objective-c language work including message sending, ivars and properties. This post shows an example of where I have used the Objective-C runtime in one of my projects.
One example of where I have used the runtime in my projects is the validation code in DBValidator. The validation code is implemented as a category on NSObject called NSObject+DBValidator. This is so we can add validation rules to any objective-c object. The only problem with this approach is that you can’t add any properties or ivars to an object using a category.
We can work around this limitation by using the objective-c runtime directly.
Below is the implementation of the NSObject+DBValidator category:
#import "NSObject+DBValidator.h"
#import <objc/runtime.h>

#define VALIDATION_RULES_KEY @"validationruleskey"

@implementation NSObject (DBValidator)

-(void) setValidationRules:(NSMutableArray *)validationRules {
    objc_setAssociatedObject(self, VALIDATION_RULES_KEY, validationRules, OBJC_ASSOCIATION_RETAIN_NONATOMIC);
}

-(NSMutableArray*) validationRules {
    NSMutableArray *validationRules = objc_getAssociatedObject(self, VALIDATION_RULES_KEY);
    if (!validationRules)
        validationRules = [NSMutableArray array];
    return validationRules;
}

-(void) addValidationRule: (DBValidationRule*) validationRule {

    NSMutableArray *validationRules = self.validationRules;
    if (validationRule)
        [validationRules addObject:validationRule];
    self.validationRules = validationRules;
}

-(void) removeAllValidationRules {
    NSMutableArray *validationRules = self.validationRules;
    [validationRules removeAllObjects];
    self.validationRules = validationRules;
}

-(NSMutableArray*) validate {
    NSMutableArray *failureMessages = [NSMutableArray array];
    for (DBValidationRule *rule in self.validationRules) {
        BOOL isValid = [rule passesValidation];
        if (!isValid)
             [failureMessages addObject: rule.failureMessage];
    }
    return failureMessages;
}

@end
We have a @property defined in the header called validationRules and we override both the setter and getter in the implementation. In the setValidationRules: method we use a C function from the objective-c runtime called objc_setAssociatedObject. This function allows us to set a reference on the self object. We give it a key, the object (in this case the validationRules passed to the method) and the association policy.
The valid options for the association policy are:
enum {
   OBJC_ASSOCIATION_ASSIGN = 0,
   OBJC_ASSOCIATION_RETAIN_NONATOMIC = 1,
   OBJC_ASSOCIATION_COPY_NONATOMIC = 3,
   OBJC_ASSOCIATION_RETAIN = 01401,
   OBJC_ASSOCIATION_COPY = 01403
};
Notice how these options map directly to @property storage options! We are using OBJC_ASSOCIATION_RETAIN_NONATOMIC because we want our NSObject to retain the validation rules that are set on it.
In our validationRules method, we use a similar call from the objective-c runtime called objc_getAssociatedObject. This allows us to retrieve the object we set a reference to in the preious method. We have to pass the parent object and the key for the associated object we want. We return an empty array if validation rules are not yet set for this object.
Check out the full source code in the DBValidator GitHub Project
Git notes
This is a list of git notes that I use everyday. Hopefully someone else finds it useful. I will update this list over time.
- The master branch reflects production ready code only. This branch should be deployable at any time and merges to this branch should not break the build process.
- Feature branches should be merged into the master when they are complete.
- Feature branches consist of a single feature or discrete unit of work
- Commit early and commit often!
Generating SSH-Public Key
- Switch to your .ssh directory and check if the id_rsa.pub file exists, this is your public key
- If it doesn’t exist, generate one with the following command
ssh-keygen -t rsa -C "youremail@email.com"Output is something like the following:Generating public/private rsa key pair. Enter file in which to save the key (/Users/danielbeard/.ssh/id_rsa): Enter passphrase (empty for no passphrase): Enter same passphrase again: Your identification has been saved in /Users/danielbeard/.ssh/id_rsa. Your public key has been saved in /Users/danielbeard/.ssh/id_rsa.pub. The key fingerprint is: 43:c5:5b:5h:b1:f1:51:43:ad:20:a6:92:6a:1f:8a:3a danielbeard@iosdev.local
Copy the contents of the public key file to your clipboard:
pbcopy < ~/.ssh/id_rsa.pub
Normal Workflow
- Checkout the remote repository with:
git clone git@github.com:AustralianFinanceGroup/SalesTools.git - Updating the repository (won’t need to be done the first time):
git pull - Create a new branch from the master or current development branch
git checkout -b featurebranchname master - Make changes to local files
- Check local modifications with
git status - Stage certain files with
git add <file1> <file2>etc or add all changesgit add . - Commit to you local repository
git commit -m 'commit message' - Push the local commit to the remote repository and set up for tracking
git push -u origin featurebranchname - Repeat until feature branch is complete.
- Merge master or development branch into the working branch
git checkout mastergit pullgit checkout featurebranchnamegit merge master
- Push to remote repository
git push -u origin featurebranchname - Submit pull request and wait for code review
Repository Changes
- Checking which files are in what state:
git status - Tracking new files:
git add README - Committing your changes:
git commit -m 'Commit message goes here' - Push your current master to the remote origin:
git push -u origin master - Unstaging a staged file:
git reset HEAD <file> - Stage all untracked files –
git add -u - Unmodifying a modified file:
git checkout -- benchmarks.rb
Notes:
- The git add command stages a file for a commit. Calling git status shows which files are staged/unstaged or if they are untracked.
- If you modify a file after calling git add, the git status command will show the file as being both staged and unstaged.
- If you modify a file after calling git add, you have to run git add again to stage the latest version of the file
Providing the -a option to git commit makes git automatically stage every file before doing the commit. (Letting you skip the git add part)
Basic repository changes: http://git-scm.com/book/en/Git-Basics-Recording-Changes-to-the-Repository
Branching
- Creating a new branch:
git checkout -b branchname - Branching from a current branch:
git checkout -b feature devbranch - Pushing branch to remote with tracking:
git push -u origin branchname - Rename branch
git branch -m <oldname> <newname> - Delete the local branch:
git branch -d branchname - Delete the remote branch:
git push origin :branchname - Listing all branches:
git branch -a - Just list remote branches:
git branch -r - Checking out a tracked remote branch:
git checkout --track origin/branch_name - Merging a branch
- Must have committed all changes (at least locally) like so:
git commit -a -m "Made a change in this branch" - Switch to whichever branch you are merging back into, e.g. master
git checkout master - Merge the branch (ALWAYS USE NO-FF):
git merge --no-ff branchname
- Must have committed all changes (at least locally) like so:
Notes:
Tracked branches are local branches that have a direct relationship to a remote branch.
If you’re on a tracking branch and type git push or git pull, git automatically knows which branch and server to push/pull from.
Git remote branches :http://git-scm.com/book/en/Git-Branching-Remote-Branches#Tracking-Branches
Git local branches: http://git-scm.com/book/en/Git-Branching-Basic-Branching-and-Merging
Tagging
- Only used for tagging master branch merges or “releases”
- You can tag at any point, it doesn’t have to be immediately.
- Show the commit history like this:
git log --pretty=oneline
15027957951b64cf874c3557a0f3547bd83b3ff6 Merge branch 'experiment'
a6b4c97498bd301d84096da251c98a07c7723e65 beginning write support
0d52aaab4479697da7686c15f77a3d64d9165190 one more thing
6d52a271eda8725415634dd79daabbc4d9b6008e Merge branch 'experiment'
0b7434d86859cc7b8c3d5e1dddfed66ff742fcbc added a commit function
4682c3261057305bdd616e23b64b0857d832627b added a todo file
166ae0c4d3f420721acbb115cc33848dfcc2121a started write support
9fceb02d0ae598e95dc970b74767f19372d61af8 updated rakefile
964f16d36dfccde844893cac5b347e7b3d44abbc commit the todo
8a5cbc430f1a9c3d00faaeffd07798508422908a updated readme
- To tag a certain commit, specify the commit checksum (or part of it) at the end of the command
git tag -a v1.2.1 9fceb02 - Then to transfer all your tags to the remote repository
git push origin --tags
Git tags: http://git-scm.com/book/en/Git-Basics-Tagging
Tracking changes between branches
- Show the modified files between two branches:
git diff --name-status master..branch - Show side by side comparison :
git difftool -t vimdiff master..branch
Other notes and links
Git aliases: http://git-scm.com/book/en/Git-Basics-Tips-and-Tricks#Git-Aliases
Branching model: http://nvie.com/posts/a-successful-git-branching-model/
GitHub flow: http://scottchacon.com/2011/08/31/github-flow.html
General purpose validation library for objective-c and iOS
This is a simple validation framework that I created for one of my projects that I am releasing under an open source MIT license.
The framework supports a number of different types of validations including string length, number range, email validation, regex validation and equality.
Validation rules can be added to any keypath of any object that inherits from NSObject, as well as having multiple validation rules per object. Here is a screenshot:
And here is the project on Github – DBValidator
Adding a border to UILabel
I have created a simple control that subclasses UILabel to add a border. Here’s a screenshot:
Check out the project on GitHub
